
Bit4id Signing API (3.1.0)
Signing enables efficient and paperless document and signature flows. The cloud service is designed to ensure the legal validity of processes, with the ability to use all types of electronic signatures, time stamps, and regulatory storage.
API integration ensures full adaptation within pre-existing management setups.
In association with Onboarding, Signing enables the management of the entire identification and contextual signature release flow, so that documents and contracts can be signed immediately.
Signing provides three different experiences, relating to:
ADMIN, in charge of creating, editing and disabling users (admins, instructors and signers) and robots, as well as creating and signing practices
INSTRUCTOR, in charge of creating and editing Signer, as well as creating and signing practices
SIGNER, in charge of signing practices.
The platform allows you to choose the desired signature profile described in table:
| Name | Description | Technical Standard |
|---|---|---|
| CAdES (CMS Advanced Electronic Signatures) is a set of extensions to Cryptographic Message Syntax (CMS) signed data making it suitable for advanced electronic signatures | ||
| Is an extension of CAdES-B-Level for which a Trust Service Provider has generated a trusted token (time-mark or time-stamp token) proving that the signature itself actually existed at a certain date and time | ||
| PAdES (PDF Advanced Electronic Signatures) is an extension of the PDF format that enables the creation and verification of digital signatures in PDF files | ||
| Is an extension of PAdES-B-Level for which a Trust Service Provider has generated a trusted token (time-mark or time-stamp token) proving that the signature itself actually existed at a certain date and time |
The main signature types are described in table:
| Name | Description |
|---|---|
| Electronic Signature with click | The signer put a signature with just on click |
| Electronic Signature with OTP | The signer put a signature with a click and an OTP |
| Graphometric Signature | The signer handwrites its signature on the graphometric tablet |
| Advanced Electronic Signature | The signer put a signature using a remote certificate issued specifically for Advanced Electronic Signature |
| Qualified Electronic Signature | The signer put a signature using a smartcard, token or remote certificate issued specifically for Qualified Electronic Signature |
| Qualified Electronic Signature using previous identities (SPID) | The signer put a signature using a disposable remote certificate issued specifically for Qualified Electronic Signature |
There are different environments for Signing API integration.
They are divided according to the purpose for which the service can be implemented.
| Environment | Description | Endpoint |
|---|---|---|
| Sandbox | Test environment | https://web.sandbox.signingtoday.com |
| Demo | Demo environment | https://web.demo.signingtoday.com |
| Live | Production environment | https://web.signingtoday.com |
The same environments can be used for access to the platform via browser.
Before you begin
Choose the right environment to contact among SANDBOX, DEMO, LIVE (e.g. https://web.sandbox.signingtoday.com)
Choose the authentication method between the following options:
Authentication via Bearer, by setting a bearer token in the header of an HTTP Request
Oauth2.0, by calling the API /oauth passing the user credentials
Remember that, if the request has a body, another HTTP header is required:
Content-Type, withapplication/jsonvalue.(optional) If you are using a Robot user, choose a webhook service to receive notifications from Signing. The Signing platform sends POST requests which contains some useful data, for example:
DST identifier:
data.dst.id;Status of the DST:
data.status;
Step 1 Create a DST
Create a DST using the Create a DST API, necessarily defining:
At least one
documents[n].document_urithat's the document URI to signAt least one
documents[n].groups[n][n].signerobject withfirst_name,last_nameandemailthat are data of the expected signer
Note: In the Create a DST API there are some examples of which include electronic signature with click, electronic signature with OTP, graphometric, advanced, qualified signature.
Step 2 Get the signature ticket
The signature_ticket is a pre-authenticated link useful to access to the document to sign.
This link is sent to the user's e-mail address set in documents[n].groups[n][n].signer.email.
Otherwise, you can inhibit the email sending and extract the signature ticket to provide to the user.
In the Create a DST API, you can disable the email sending asserting the boolean parameter
metadata.studio_email_disabled ; then, you can call the Retrieve a DST API passing the request identifier
and get the documents[n].groups[n][n].signature_ticket value.
Step 3 Sign the DST
So, you can open the link received in the email or redirect the user to the URL exposed by the
documents[n].groups[n][n].signature_ticket parameter.
According to the signing mode, follow the on-screen instructions to sign the document.
Step 4 Download signed documents
You can obtain signed documents of a specific DST by calling the Retrieve DST API declaring in URL path your slug and the DST id.
Explore the documents[n].document path which is valued by the URL of the signed document.
Then, make a call to the obtained URL by authenticating adding the field "Authorization: Token {{token}}" to the HTTP request header. Exploring every document value in documents[n] array you can easily download all signed document.
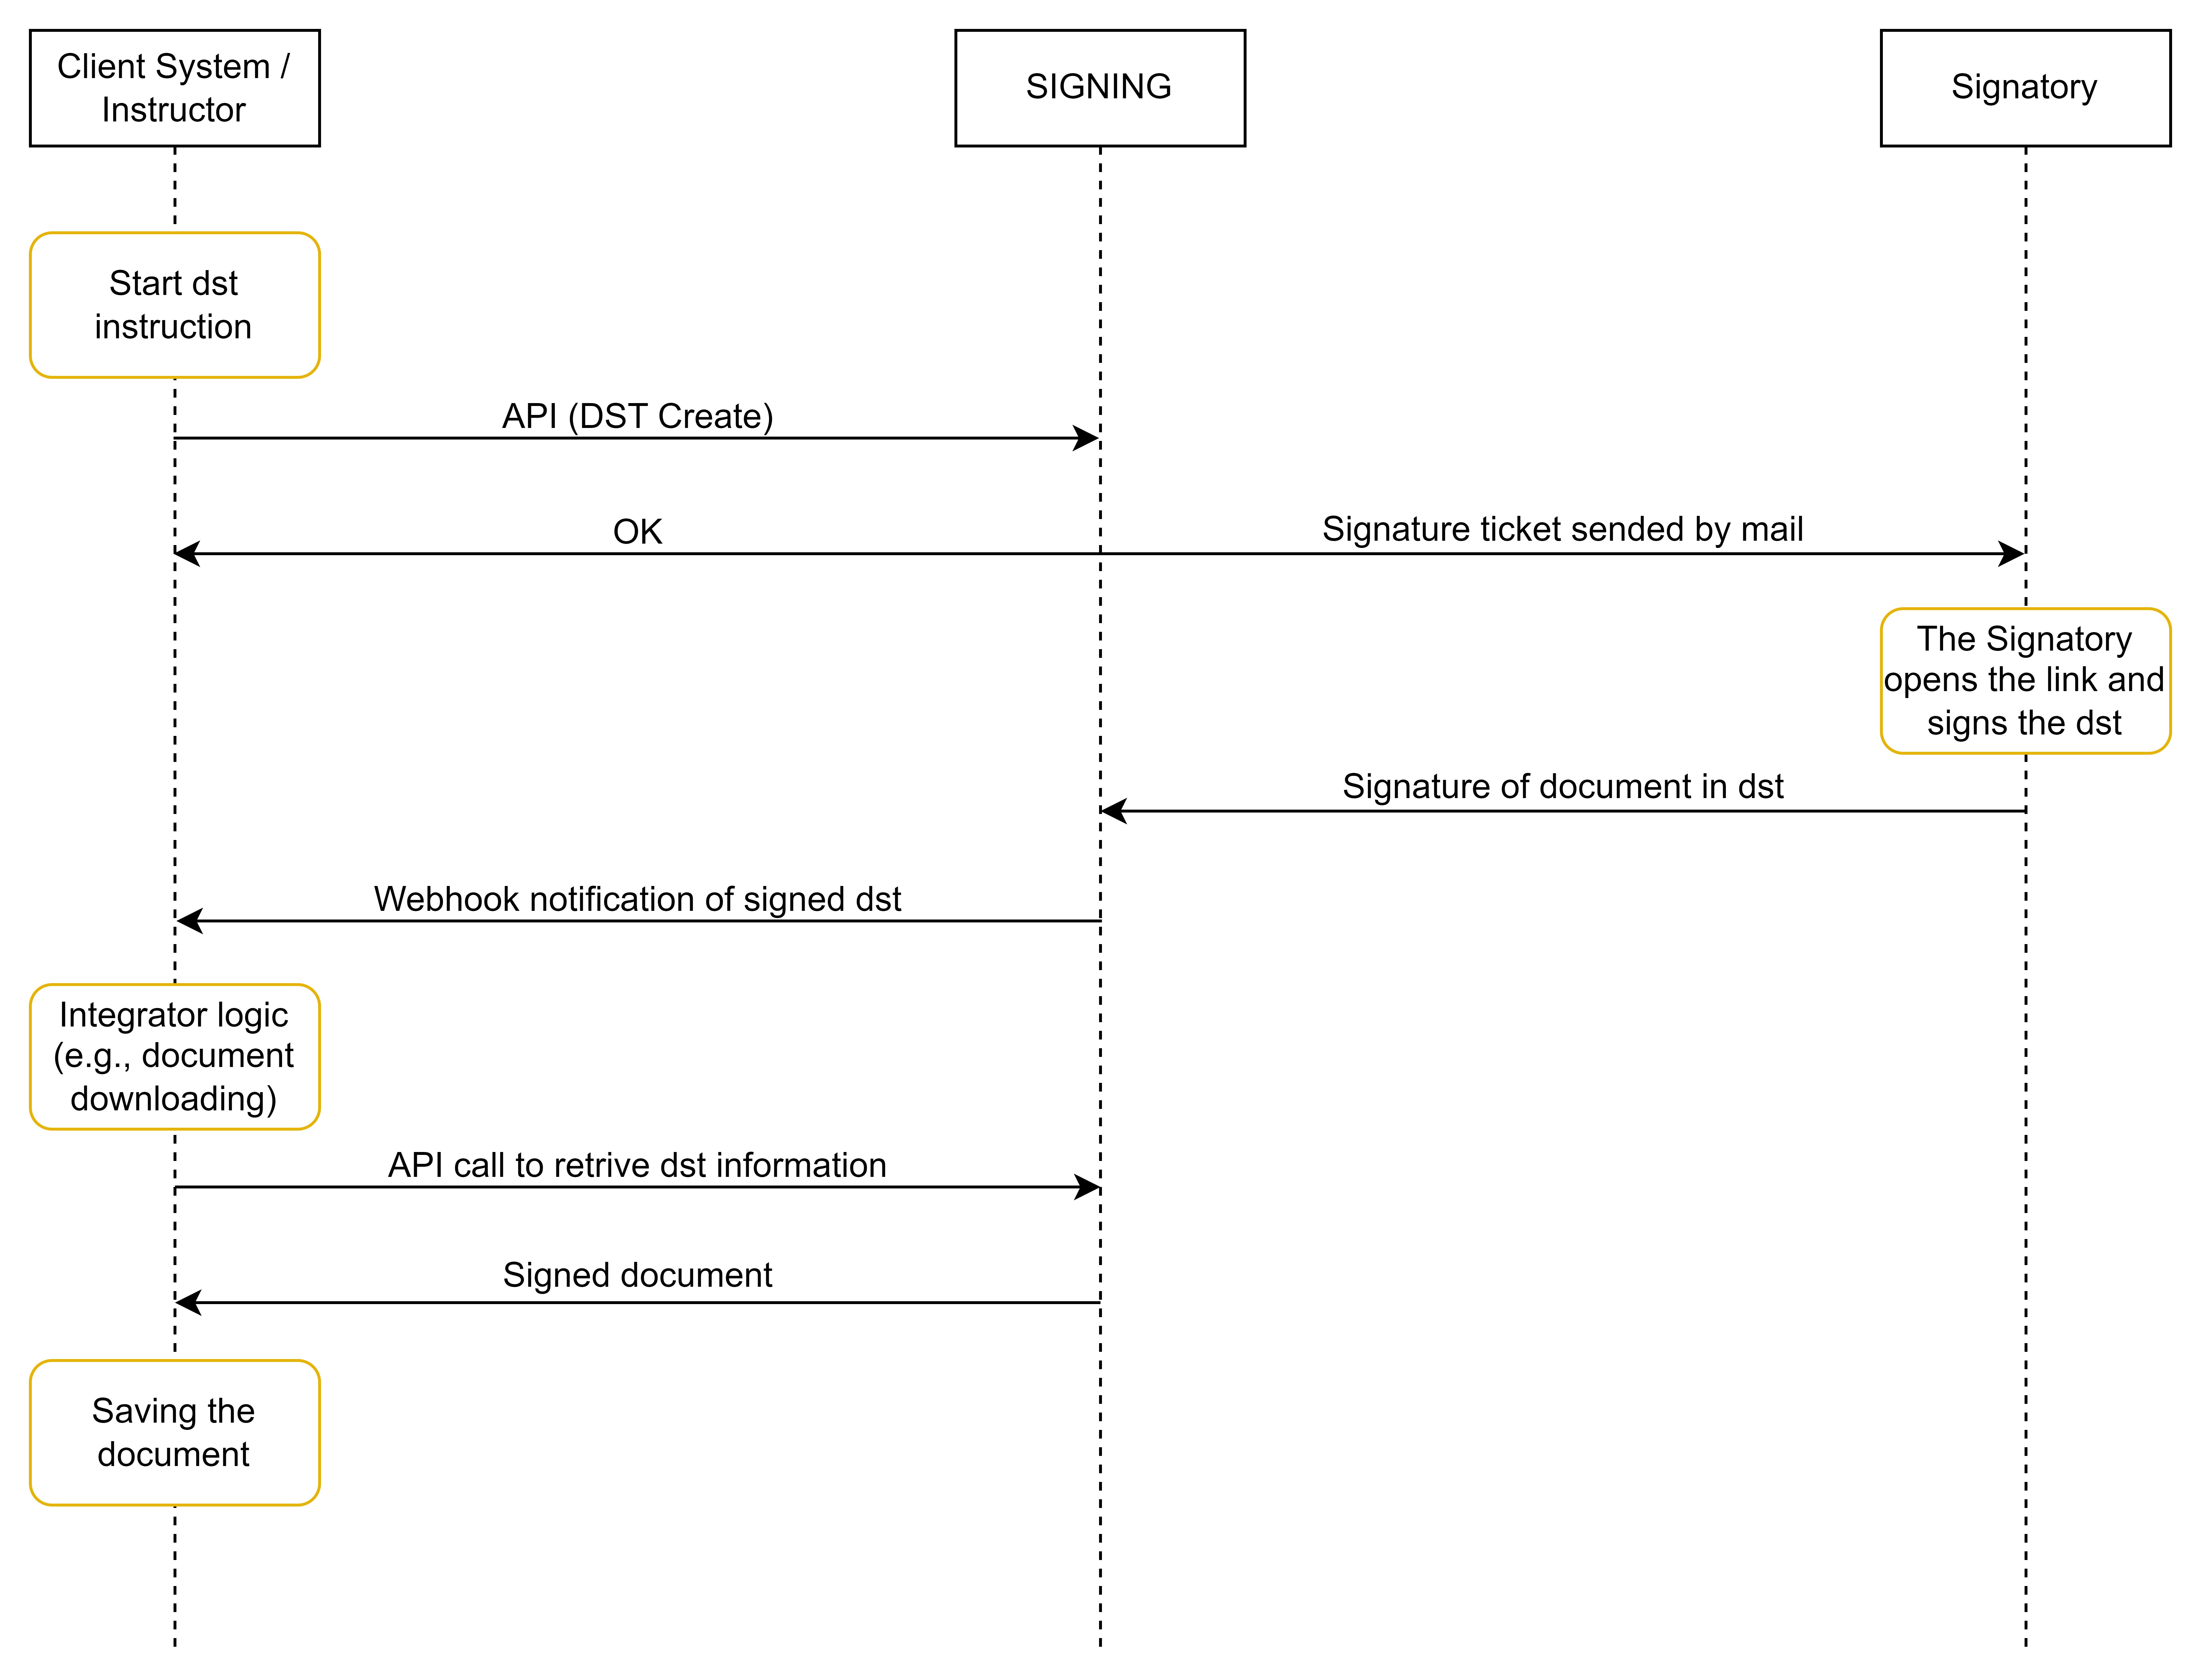
To test the workflow, complete yourself the process and check what happen at the end.
Below is a graphic that allows you to see a simple integration scenario.
APIs use the right HTTP verb in every situation.
| Method | Description |
|---|---|
GET |
Request data from a resource |
POST |
Send data to create a resource |
PUT |
Send data to modify a resource |
DELETE |
Delete a resourse |
A DST may have different states depending on the operations performed as described below.
| Code | Description |
|---|---|
| pending | dst has been successfully created and is waiting for all users to sign |
| performed | all users have correctly signed the dst |
| cancelled | at least one signing user declines to sign |
To use the Bearer authentication method, an administrator of the Signing organization must create a robot user to retrieve the associated Bearer token. The robot configuration is available on the GUI of the Signing web application.
For this purpose, it is necessary to log in to the web application entering the following credentials: organization, username and password.
Once you have logged in, to create the Robot User you need to go to the Users section of the menu, clicking on the icon on the top left represented by the 3 horizontal rows in a stack.
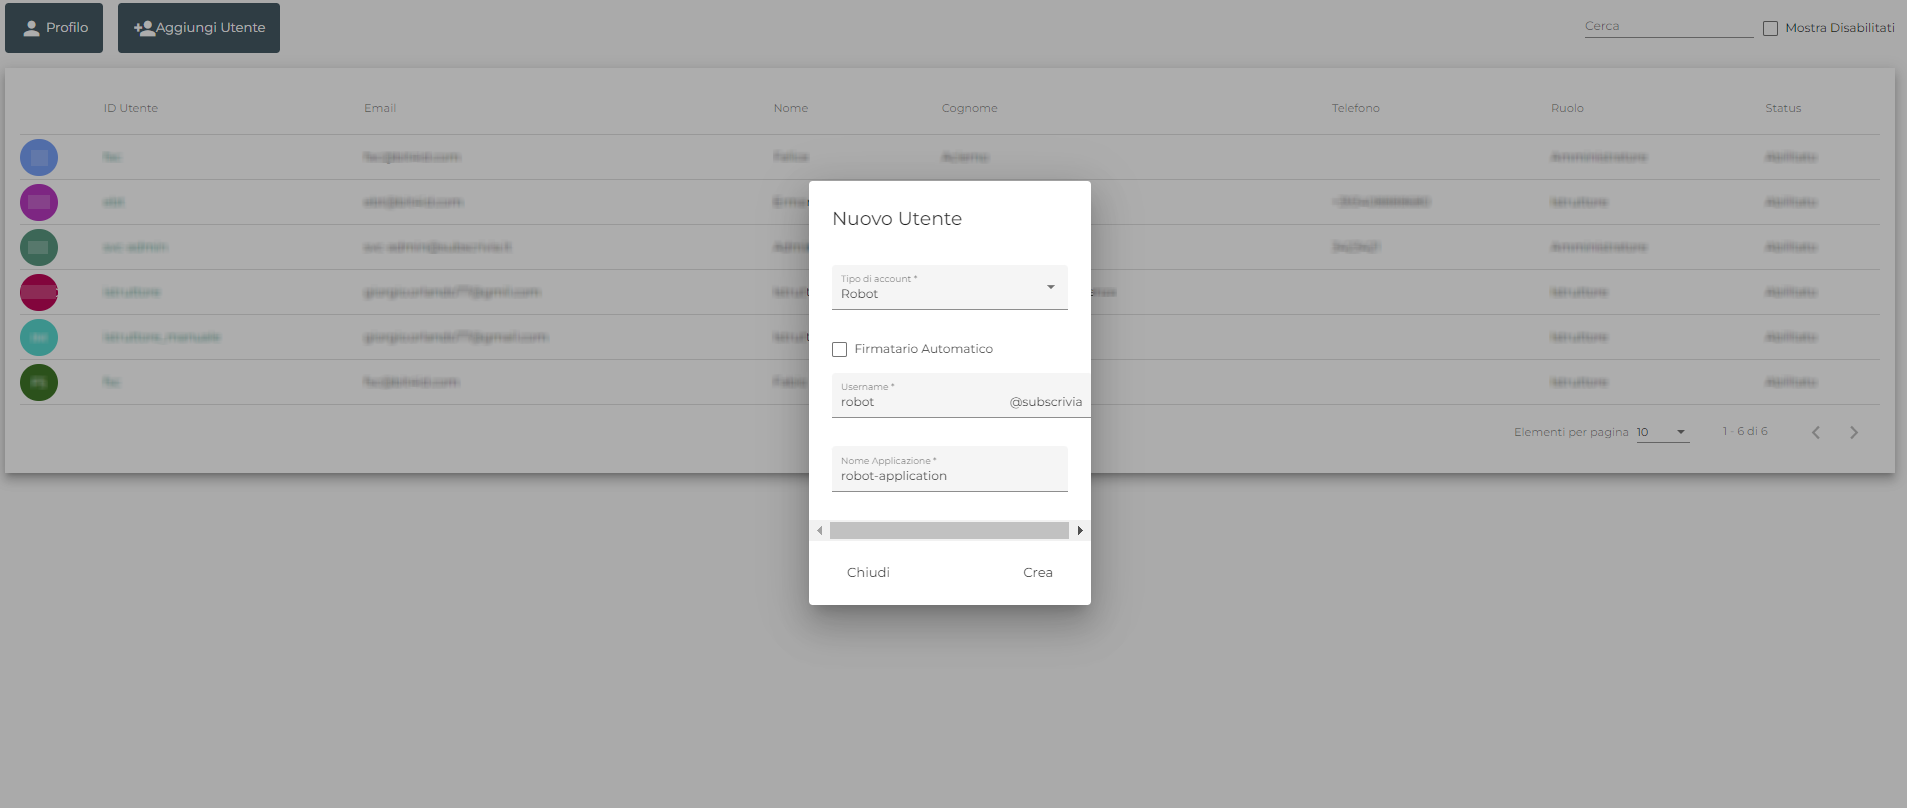
At this point, you must click on the Add User button in the top left-hand corner, select the Robot entry in the first select box Account Type. Then choose a username and an application name and finally click on the Create button.
Click on the newly created user in the list to access the Robot User summary page and select, on the upper left, the menu highlighted by the three vertical dots to the right of the Contact Data field.
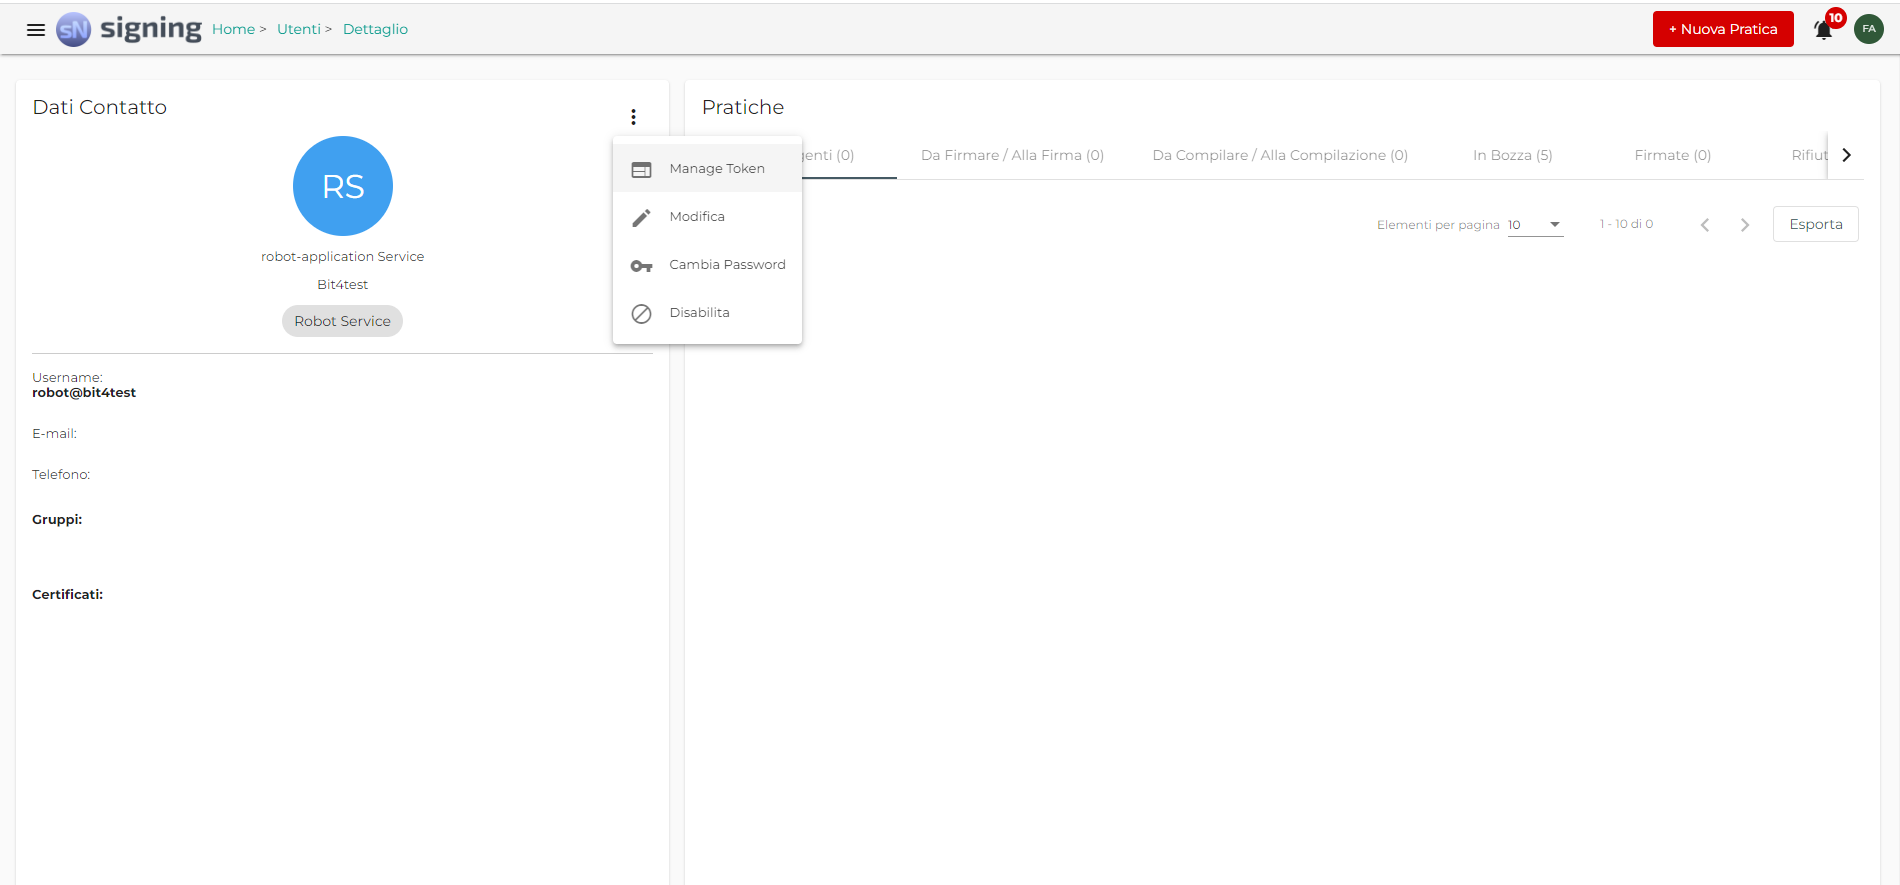
Select Manage Token to set the Authentication Token, i.e. the Lifetime Token to be used in API calls.
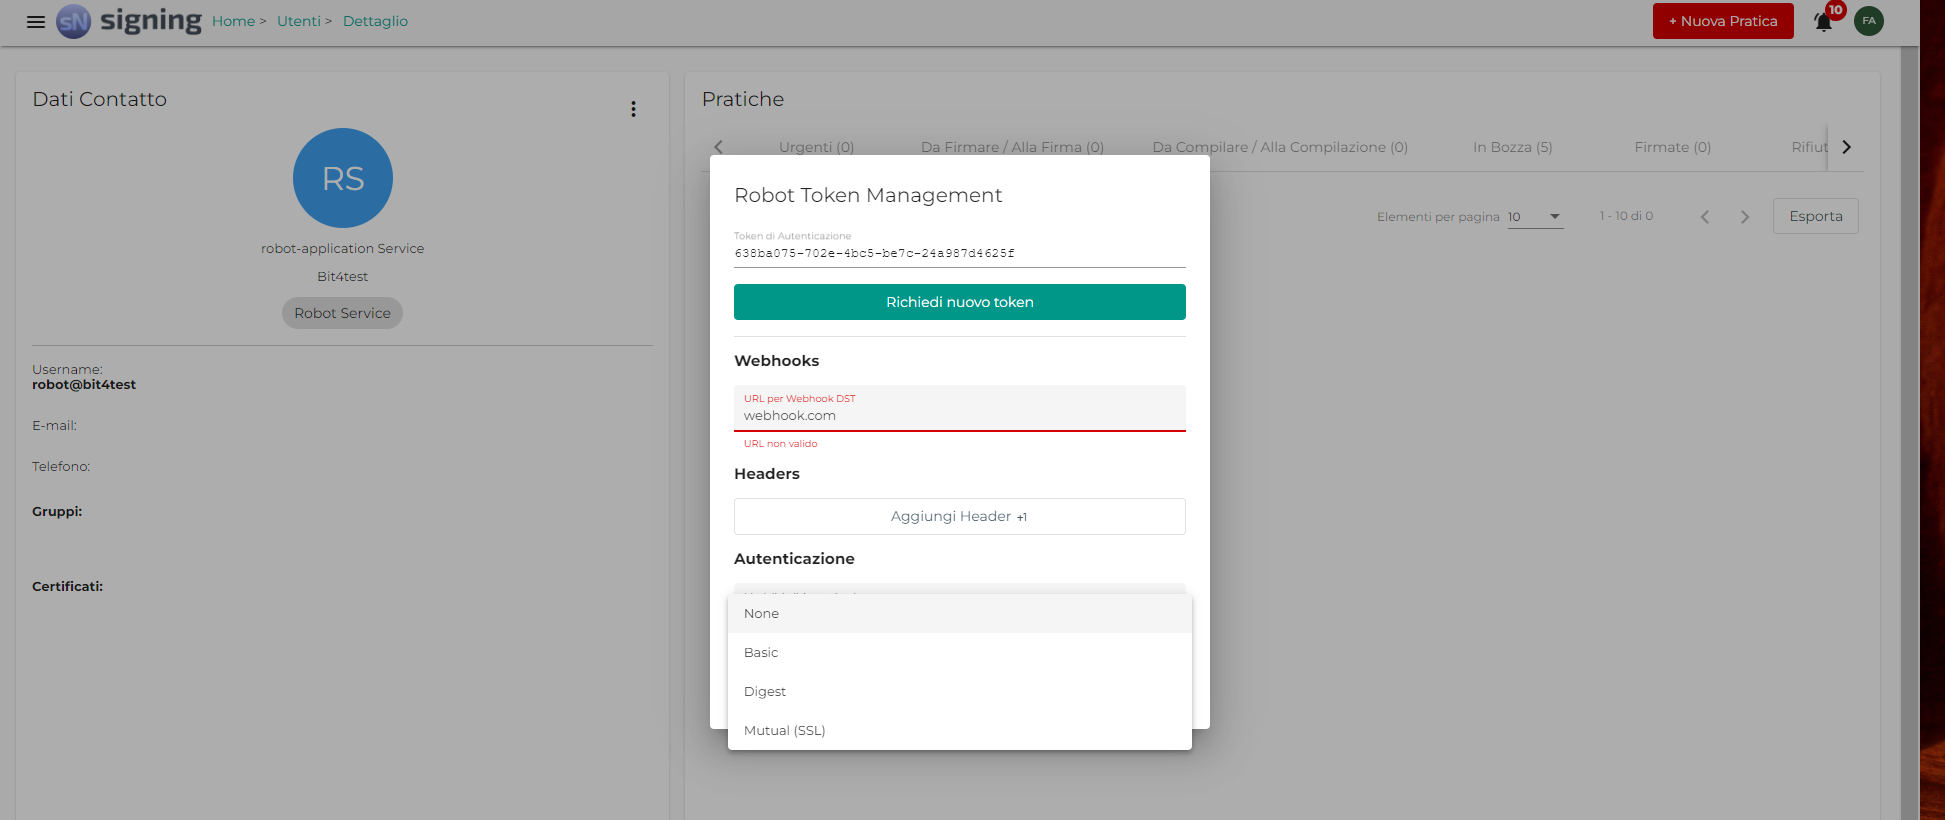
From the modal that appears, it is possible to configure the URL of the webhook to be associated with the Robot User, as well as the header and authentication settings.
Those settings will be used to access the documents[n].document_uri parameter and the webhook URL
relatively to the DSTs created by the Robot User you are setting up. However, the
documents[n].document_uri authentication settings can be overridden by the
documents[n].document_uri_options described in the Digital Signature Transactions (DST) paragraph.
The Webhooks field of the Robot configuration represents the URL associated to the server able to listen for notifications, which will be sent by Signing as POST requests, with JSON-type payload, about DST and signature status.
After configuring the Robot user by entering the webhook address, we can proceed to analyze the notifications that will be received as a result of the creation of a DST and the signing of a DST.
Every state described in this paragraph follows the finite-state machine below.

Creation of a DST
After performing the call to the Create a DST API, notifications are received for two different processes:
Saving the created DST
Creation of the signature request
Upon saving the DST, the system sends us the notification with Http Header user-agent valued as Apache-HttpClient. This notification informs you that the DST is created and is available the dst id following the
data.dst path and the status following the path data.status.
  {
    "message": "DST_STATUS_CHANGED",
    "meta": {},
    "data": {
      "status": "pending",
      "title": "<title>",
      "dst": "<dst-id>",
      "reason": null,
      "slug": "<slug>",
      "metadata": {}
    },
    "created": "<date>"
  }
Simultaneously, the system alerts us to the creation of the signature transaction by sending a single notification structured as follows where we can read general information about that transaction such as:
who the signer is following the path
data.signervalorized with the user's e-mailthe id of the signature transaction following the path
data.dst.idthe organization it belongs to following the path
data.slugthe signature profile following the path
data.profile
  {
    "message": "SIGNATURE_STATUS_CHANGED"
    "meta": {},
    "data": {
      "profile": "<profile>",
      "status": "pending",
      "group": 0,
      "dst": {
        "title": "<title>",
        "id": "<dst-id>",
        "metadata": {}
      },
      "page": "<page_number>",
      "signature": "<signature-id>",
      "signer": "x-mail.mail.com",
      "position": "rect: 216, 117, 216, 101",
      "document": {
        "order": 0,
        "display_name": "<doc-name>",
        "id": "<doc-id>",
        "metadata": {}
      },
      "automatic": false,
      "slug": "<slug>",
      "metadata": {}
    },
    "created": "<date>"
  }
Signing of a DST
Upon signing you receive two notifications the first one notifying you that the signature transaction has completed by receiving the json where you can see that the status changes to performed.
  {
    "message": "SIGNATURE_STATUS_CHANGED",
    "meta": {},
    "data": {
      "profile": "<profile>",
      "status": "performed",
      "group": 0,
      "dst": {
        "title": "<title>",
        "id": "<dst-id>",
        "metadata": {}
        },
      },
      "page": "<page_number>",
      "signature": "<signature-id>",
      "signer": "x-mail.mail.com",
      "position": "rect: 216, 117, 216, 101",
      "document": {
        "order": 0,
        "display_name": "<doc-name>",
        "id": "<doc-id>",
        "metadata": {}
      },
      "automatic": false,
      "slug": "<slug>",
      "metadata": {}
    },
    "created": "<date>"
  }
The second one notifying you that dst is closed, and you can see that the status is changed in performed.
  {
    "message": "DST_STATUS_CHANGED",
    "meta": {},
    "data": {
      "status": "performed",
      "title": "<title>",
      "dst": "<dst-id>",
      "reason": null,
      "slug": "<slug>",
      "metadata": {}
    },
    "created": "<date>"
  }
Reject a DST
It is possible that a DST may be rejected by the signer during the signing process, in this case the system will send a single notification informing that the DST has passed into cancelled status.
  {
    "message": "DST_STATUS_CHANGED",
    "meta": {},
    "data": {
        "status": "cancelled",
        "title": "<title>",
        "dst": "<dst-id>",
      "reason": "declined",
      "slug": "<slug>",
        "metadata": {}
      },
      "created": "<date>"
  }
It is possible to set up a case with multiple signatories sorted into signature groups. Signatories from the same group may sign in any order.
When all the signatories of a group have affixed their signature, the possibility of signing for the signatories of the subsequent groups is unlocked (and only then will the signature requests be sent via email, if the sending of the emails has not been inhibited).
In the Create a DST API, the documents[n].groups parameter is a nested ordered list: documents[n].groups[n] is the list of the groups and the documents[n].groups[n][n] second-level list is the list of signers
The signature_ticket is a pre-authenticated URL to be exposed to the user. Through
this link, the user can access the graphical user interface to perform the service.
The signature ticket is generated after the creation of the dst.
It can be retrieved in the data.documents[n].groups[n].signature_ticket field in the response to the
API Retrieve DST.
The Signing platform sends automatic signing requests to the user via e-mail.
It is also possible to inhibit the email sending. In this case you have to set
metadata.studio_email_disabled field, in payload of Create a DST request, to true for
disabling the automatic sending of notification e-mails.
The API section having tag Robots allows to:
Authenticate like robot user
Get the robot configuration
Edit the robot configuration
To perform this api you need to have an ADMIN account.
Retrieve the Robot authentication lifetime token
This API allows to generate or retrieves the Robot authentication lifetime token for the specified robot account, or the current logged in account.
Authorizations:
query Parameters
| username | string Example: username=thirdPartApp The username associated to the account |
| domain | string Example: domain=demo The domain associated to the account |
Responses
Response samples
- 200
- 401
- 500
{- "accessToken": "19a6f7b6-e558-46c7-ac1c-ed4fea78e644"
}Retrieve the Robot configuration
This API allows to retrieve the Robot configuration.
Authorizations:
query Parameters
| username | string Example: username=thirdPartApp The username associated to the account |
| domain | string Example: domain=demo The domain associated to the account |
Responses
Response samples
- 200
- 401
- 500
{- "requestHeaders": {
- "Authorization": [
- "Token eed3fc66-cfc8-4b11-9bf9-33493d95411b"
]
}, - "authentication": {
- "username": "jdo",
- "password": "A12345678z",
- "authMode": "basic",
- "clientKey": "clientKey",
- "clientCert": "<client certificate>"
},
}Edit the Robot configuration
This API allows to edit the Robot configuration.
Authorizations:
query Parameters
| username | string Example: username=thirdPartApp The username associated to the account |
| domain | string Example: domain=demo The domain associated to the account |
Request Body schema: application/json
RobotConfiguration.
object Eventually the headers the application have to use during requests | |
object The data the application will use to authenticate itself wherever there will be the need, for example in order to access to a resource | |
object customer notification server |
Responses
Request samples
- Payload
{- "requestHeaders": {
- "Authorization": [
- "Token eed3fc66-cfc8-4b11-9bf9-33493d95411b"
]
}, - "authentication": {
- "username": "jdo",
- "password": "A12345678z",
- "authMode": "basic",
- "clientKey": "clientKey",
- "clientCert": "<client certificate>"
},
}Response samples
- 401
- 500
{- "error": "invalid_token",
- "error_description": "Invalid access token: wG3kD7duowufuOWGWFAI6sn"
}The api section having tag Authentication allows to:
- Perform login, simply using Oauth2.0 protocol
Oauth2.0
To perform Oauth2.0 authentication you need to know:
Username
Password
Cliend id
Secrete
AccessUrl
Then make sure to add the Basic Auth header in HTTP headers.
By call the following API and you'll receive the following couple of parameters:
access token
refresh token
Note: OAuth2 method API access is allowed but discouraged. For interaction with the API, it is preferable to use the token provided with the Robot User as this corresponds to a technical user not associated with a natural person.
Request Body schema: multipart/form-data
| username | string The username in the form username@domain where domain is the organization the user belongs to |
| password | string This is the actual password of the user |
| grant_type | string Value: "password" A parameter that indicates the type of the grant in order to perform the basic authentication |
| client_id | string name of your organization |
Responses
Response samples
- 200
- 401
{- "access_token": "5c7fe85e-5ccd-4ae7-9629-ed49f969eee9",
- "token_type": "bearer",
- "refresh_token": "ef1185f4-2af7-4bf2-acd5-3c4b2e7dad72",
- "expires_in": 30623,
- "scope": "all"
}The api section having tag Users allows to:
Create a user
Modify user's configuration
Delete a user
Enable or disable a user
Retrieve information about a user
To perform this api you need to have an ADMIN account.
Create a new User
This API allows to create a new User.
Request Body schema: application/json
User to create
required | object (User) The User object is the one that serializes the users of the Organizations. The User has field that identifies the generality of the person who has been registered and uses the platform, as well as the digital identities through which he can sign documents. |
| password | string This represents the password the user will use to login from the web interface. If the field is omitted the email address provided during the creation of the user will receive an email with a link from where will be possible to set a password |
Responses
Request samples
- Payload
{- "user": {
- "username": "jdo",
- "domain": "bit4id",
- "language": "en",
- "name": "John",
- "surname": "Doe",
- "email": "john.doe@email.com",
- "phone": "+013392213450",
- "role": "signer",
- "groups": [
- {
- "name": "Marketing BU",
- "domain": "bit4id"
}
], - "capabilities": "user.pwd.clear",
- "extraData": {
- "property1": { },
- "property2": { }
}, - "templateData": {
- "taxNumber": "RSSMRA30A01H501I"
}
}, - "password": "A12345678z"
}Response samples
- 201
- 400
- 401
- 403
- 500
"7e49d963-544e-407e-ba57-049785ef3760"Retrieve Users
This allows to get the list of the Users of an Organization.
query Parameters
| $top | integer <int32> Example: $top=32 A number of results to return. Applied after $skip |
| $skip | integer <int64> Example: $skip=64 An offset into the collection of results |
| $count | boolean Example: $count=true If true, the server includes the count of all the items in the response |
| $orderBy | string Example: $orderBy=$orderBy=updatedAt An ordering definition (eg. $orderBy=updatedAt,desc) |
| $filter | string Example: $filter=$filter=name=="Milk" A filter definition (eg. $filter=name == "Milk" or surname == "Bread") |
Responses
Response samples
- 200
- 400
- 401
- 403
- 500
{- "count": 1,
- "values": [
- {
- "id": "e6419924-fd1d-4c42-9fa2-88023461f5df",
- "username": "jdo",
- "domain": "bit4id",
- "language": "en",
- "name": "John",
- "surname": "Doe",
- "email": "john.doe@email.com",
- "phone": "+013392213450",
- "role": "signer",
- "groups": [
- {
- "id": 1,
- "name": "Marketing BU",
- "domain": "bit4id"
}
], - "capabilities": "user.pwd.clear",
- "createdBy": "9a608f1a-e42a-4d05-8e2b-1df8ec63cd5d",
- "createdAt": "2007-04-02T19:30:10Z",
- "deletedAt": "2007-04-02T19:30:10Z",
- "automatic": false,
- "extraData": {
- "property1": { },
- "property2": { }
}, - "templateData": {
- "taxNumber": "RSSMRA30A01H501I"
}
}
]
}Retrieve a User
This API allows to retrieve a User.
path Parameters
| id required | string <uuid> Example: 737dc132-a3f0-11e9-a2a3-2a2ae2dbcce4 The value of the unique id |
Responses
Response samples
- 200
- 401
- 403
- 404
- 500
{- "id": "e6419924-fd1d-4c42-9fa2-88023461f5df",
- "username": "jdo",
- "domain": "bit4id",
- "language": "en",
- "name": "John",
- "surname": "Doe",
- "email": "john.doe@email.com",
- "phone": "+013392213450",
- "role": "signer",
- "groups": [
- {
- "id": 1,
- "name": "Marketing BU",
- "domain": "bit4id"
}
], - "capabilities": "user.pwd.clear",
- "createdBy": "9a608f1a-e42a-4d05-8e2b-1df8ec63cd5d",
- "createdAt": "2007-04-02T19:30:10Z",
- "deletedAt": "2007-04-02T19:30:10Z",
- "automatic": false,
- "extraData": {
- "property1": { },
- "property2": { }
}, - "templateData": {
- "taxNumber": "RSSMRA30A01H501I"
}
}Enable or disable a User
This API allows to enable or disable a User account.
path Parameters
| id required | string <uuid> Example: 737dc132-a3f0-11e9-a2a3-2a2ae2dbcce4 The value of the unique id |
query Parameters
| enabled | boolean Default: false Example: enabled=true This is a boolean parameter. If true the User is enabled |
Responses
Response samples
- 401
- 403
- 404
- 500
{- "error": "invalid_token",
- "error_description": "Invalid access token: wG3kD7duowufuOWGWFAI6sn"
}Update a User
This API allows to update a User.
path Parameters
| id required | string <uuid> Example: 737dc132-a3f0-11e9-a2a3-2a2ae2dbcce4 The value of the unique id |
Request Body schema: application/json
User replacing current object.
| username | string <any> The username of the User. The username is used to login |
| domain | string |
| language | string <string> Enum: "it" "en" "es" "fr" The default language of the User |
| name | string <any> The name of the User |
| surname | string <any> The name of the User |
string <email> The email address of the User | |
| phone | string <number> The phone number of the User |
| role | string <any> Enum: "admin" "instructor" "signer" The role of the User. The admin can create users, as well as DSTs and can sign. The instructor can create DSTs and sign. The signer can only sign documents. |
Array of objects (UserGroup) A group of users. This is useful during DSTs creation, it is possible to select a group as signers. This way all the components of that group have to sign the document | |
| capabilities | Array of strings The capabilities represents the action a user is able to do |
object <object> Extra data associated to the User | |
object Additional user data in json serialized format |
Responses
Request samples
- Payload
{- "username": "jdo",
- "domain": "bit4id",
- "language": "en",
- "name": "John",
- "surname": "Doe",
- "email": "john.doe@email.com",
- "phone": "+013392213450",
- "role": "signer",
- "groups": [
- {
- "name": "Marketing BU",
- "domain": "bit4id"
}
], - "capabilities": "user.pwd.clear",
- "extraData": {
- "property1": { },
- "property2": { }
}, - "templateData": {
- "taxNumber": "RSSMRA30A01H501I"
}
}Response samples
- 400
- 401
- 403
- 404
- 500
{- "meta": {
- "code": 400,
- "error_type": "ValidationError",
- "error_message": "document_uri : Questo campo non può essere omesso."
}
}The API section having tag Manage password allows to:
Change passowrd for a specific user
Send email for password changing
Change user password
Authorizations:
Request Body schema: application/json
change user password payload
| username required | string the username of the operator that need to change password |
| old_password required | string |
| new_password required | string |
| new_password_check required | string |
Responses
Request samples
- Payload
{- "username": "mario.rossi",
- "old_password": 123456789,
- "new_password": 987654321,
- "new_password_check": 987654321
}Response samples
- 409
{- "code": 2028,
- "message": "new_password and new_password_check do not match",
- "kwargs": { }
}Send email to reset password
by this call you can send an email to the user the need the password change
Authorizations:
path Parameters
| username required | string <uuid> username of the user that need the password reset |
Responses
Response samples
- 404
{- "code": 2031,
- "message": "Username not found",
- "kwargs": { }
}The API section having tag Digital Signature Transaction allows to:
Create a DST
Retrieve a DST
Retrieve all DSTs
In creating a DST there is a documents[n] field that presents a list of documents.
Each document is represented by the documen[n].document_uri or documen[n].document field.
In documen[n].document_uri is possible to pass a URL to access the document to sign.
Otherwise documen[n].document field is possible to insert a PDF as base64.
If you use the document URI, you can configure the documents[n].document_uri_options field passing
headers, body and method this is an additional override level for the
http options, defined in Robot User configuration, for downloading documents.
The following configurations are possible:
Basic Authentication:
auth_username(string): username for http authentication
auth_password(string): password for http authentication
auth_mode(string): authentication mode -basic(default),digest
Client Authentication:
client_cert(string): base64 of public key pem
client_key(string): base64 of the private key pem
HTTP Authentication:
- headers(json): list of additional headers for requests
Also you can change the method of the document download request or add a body.
It's even possible to set the placeholder location of a visible signature appearance, with the following parameters:
documents[n].groups[n][n].where.pagewith the integer indicating the pagedocuments[n].groups[n][n].where.positionwith a string such as 'rect: 10mm, 50mm, 110mm, 80mm' Note: For performance reasons related to the call of Create a DST, it is preferable to pass the document as a URL rather than loading the entire file in Base64 format.
Signature Label
It is possible to set signature label position, size, image and text.
In particular, the position key accepts as its value the definition of a
rectangle as follows: "position": "rect: 10mm, 50mm, 110mm, 80mm".
The above exaple is defining a graphic signature of size 10cm*3cm placed 5cm from the bottom margin and 1cm from the left margin. The generic structure of the rectangle definition is as follows: rect: x1, y1, x2, y2 with origin in the bottom left-hand corner. Various units are supported: millimeters (mm), inches (in) and points (pt). By default, if units of measurement are not specified, points are used.
The dots are calculated on a document dpi of 72 so 10mm equals ((10*72)/25.4)pt. To make a signature invisible, only the page must be defined in the documents[n].groups[n][n].where field of the signature.
Create a DST
With this API is possible to create a new DST. In this API you can see four different examples corresponding to the following signature types:
Electronic Signature with click, you need to specify the
documents[n].groups[n][n].provider_options.unlock_modeparameter by valuing it withclickif a simple click is required for signing,graphoif a signature graph is required orOTPif OTP is to be required (and only in this case thedocuments[n].groups[n][n].signer.phonefield is mandatory). Finally, you need to set thedocuments[n].groups[n][n].constraintsparameter with the following value:["certificate__is_simple__exact=true"]Electronic Signature with OTP, you need to specify the same parameter as above and setting the
documents[n].groups[n][n].provider_options.unlock_modeparameter by valuing it withOTPGraphometric Signature, you need to specify the same parameter as above and setting the
documents[n].groups[n][n].provider_options.unlock_modeparameter by valuing it withgraphoAdvanced Electronic Signature, you can omit the parameter
documents[n].groups[n][n].provider_optionsand the parameterdocuments[n].groups[n][n].constraintsQualified Electronic Signature, you can omit the
documents[n].groups[n][n].provider_optionsparameter. Finally, you need to set the parameterdocuments[n].groups[n][n].constraintswith["certificate__is_qualified__exact=true"]Qualified Electronic Signature using previous identities (SPID), you can omit the
documents[n].groups[n][n].provider_optionsparameter. You need to set the parameterdocuments[n].groups[n][n].constraintswith["certificate__is_qualified__exact=true", "is_disposable__eq=true", "identity_request__flow=spid"]
Note: If you are using a SandBox or Demo environment and you are going to perform a Qualified Electronic Signature using previous identities (SPID) do not set the "certificate__is_qualified__exact=true" in documents[n].groups[n][n].constraints.
Authorizations:
path Parameters
| slug required | string |
Request Body schema: application/json
| title | string The title of signature transaction |
| generate_report | boolean Request to create report |
object | |
object The documents field is an array containing document objects, where everyone of them is defined as follows | |
object |
Responses
Request samples
- Payload
{- "title": "Titolo pratica",
- "generate_report": true,
- "metadata": {
- "studio-email_disabled": false
}, - "documents": [
- {
- "metadata": { },
- "display_name": "Contratto utenza",
- "document_uri_options": {
- "headers": {
- "Authorization": "Bearer xxxxxxxxxxxx"
}, - "body": {
- "example": "Download the document"
}, - "method": "POST"
}, - "groups": [
- [
- {
- "signer": {
- "email": "mrossi@mail.com",
- "first_name": "Mario",
- "last_name": "Rossi"
}, - "clauses": [
- {
- "id": 0,
- "required": true,
- "description": "Area di firma",
- "where": {
- "page": 1,
- "position": "rect: 140,44,193,53",
- "text": [
- {
- "font": {
- "name": "Universal",
- "size": 50
}, - "format": [
- "Firmato elettronicamente",
- "da nominativofirma",
- "in data datafirma"
], - "text_align": "middle"
}
]
}
}, - {
- "id": 1,
- "required": true,
- "description": "Area di firma",
- "where": {
- "page": 1,
- "position": "rect: 140,8,193,17",
- "text": [
- {
- "font": {
- "name": "Universal",
- "size": 50
}, - "format": [
- "Firmato elettronicamente",
- "da nominativofirma",
- "in data datafirma"
], - "text_align": "middle"
}
]
}
}, - {
- "id": 2,
- "required": true,
- "description": "Area di firma",
- "where": {
- "page": 2,
- "position": "rect: 140,8,193,17",
- "text": [
- {
- "font": {
- "name": "Universal",
- "size": 50
}, - "format": [
- "Firmato elettronicamente",
- "da nominativofirma",
- "in data datafirma"
], - "text_align": "middle"
}
]
}
}
], - "display_name": "nominativofirma",
- "profile": "pades-bes",
- "reason": "Per accettazione",
- "declinable": false,
- "where": {
- "position": "rect: 134,25,197,34",
- "page": 2,
- "text": [
- {
- "font": {
- "name": "Universal",
- "size": 50
}, - "format": [
- "Firmato elettronicamente",
- "da nominativofirma",
- "in data datafirma"
], - "text_align": "middle"
}
]
}, - "constraints": [
- "certificate__is_simple__exact=true"
], - "metadata": { }
}
]
]
}
]
}
Response samples
- 201
- 400
- 401
- 403
- 404
- 500
{- "meta": {
- "code": 201
}, - "data": {
- "id": "string",
- "documents": [
- {
- "id": "string",
- "metadata": {
- "st_extension": {
- "authentication": {
- "headers": "string",
- "method": "string",
- "body": "string"
}
}
}, - "document_uri_options": {
- "headers": "string",
- "method": "string",
- "body": "string"
}, - "document_uri": "string",
- "document": "string",
- "display_name": "string",
- "groups": [
- [
- {
- "id": "string",
- "signer": "string",
- "automatic": "string",
- "provider_options": {
- "message": "string"
}, - "status": "string",
- "display_name": "string",
- "profile": "string",
- "reason": "string",
- "description": "string",
- "declinable": true,
- "delegable": true,
- "urlback": "string",
- "cancelback": "string",
- "constraints": [
- "string"
], - "text_fields": [
- { }
], - "clauses": [
- { }
], - "metadata": { },
- "signature_ticket": "string",
- "decline_reason": "string",
- "decline_datetime": "string",
- "where": {
- "page": 0,
- "position": "string",
- "image_uri": "string",
- "text": [
- {
- "font": null,
- "align": null,
- "valign": null,
- "text_align": null,
- "format": [ ]
}
]
}
}
]
]
}
], - "created_by": "string",
- "reason": "string",
- "title": "string",
- "not_after": "string",
- "urlback": "string",
- "cancelback": "string",
- "template_name": "string",
- "metadata": { },
- "auto_publishing": true,
- "status": "string",
- "description": "string",
- "generate_report": true,
- "created": "string",
- "gold": true
}
}List all DSTs
It is possible to retrieve the information of a all DSTs of an organization defined in slug field by contacting the following API. If you are using a robot user make sure to have set the Authorization with bearer token.
Authorizations:
path Parameters
| slug required | string |
Responses
Response samples
- 200
- 400
- 401
- 403
- 404
- 500
{- "meta": {
- "code": 200
}, - "data": [
- {
- "id": "string",
- "documents": [
- {
- "id": "string",
- "metadata": {
- "st_extension": {
- "authentication": {
- "headers": "string",
- "method": "string",
- "body": "string"
}
}
}, - "document_uri_options": {
- "headers": "string",
- "method": "string",
- "body": "string"
}, - "document_uri": "string",
- "document": "string",
- "display_name": "string",
- "groups": [
- [
- {
- "id": "string",
- "signer": "string",
- "automatic": "string",
- "provider_options": {
- "message": "string"
}, - "status": "string",
- "display_name": "string",
- "profile": "string",
- "reason": "string",
- "description": "string",
- "declinable": true,
- "delegable": true,
- "urlback": "string",
- "cancelback": "string",
- "constraints": [
- "string"
], - "text_fields": [
- { }
], - "clauses": [
- { }
], - "metadata": { },
- "signature_ticket": "string",
- "decline_reason": "string",
- "decline_datetime": "string",
- "where": {
- "page": 0,
- "position": "string",
- "image_uri": "string",
- "text": [
- { }
]
}
}
]
]
}
], - "created_by": "string",
- "reason": "string",
- "title": "string",
- "not_after": "string",
- "urlback": "string",
- "cancelback": "string",
- "template_name": "string",
- "metadata": { },
- "auto_publishing": true,
- "status": "string",
- "description": "string",
- "generate_report": true,
- "created": "string",
- "gold": true
}
]
}Retrieve a DST
It is possible to retrieve the information of a DST by contacting the following API. If you are using a robot user make sure to have set the Authorization with bearer token.
Authorizations:
path Parameters
| slug required | string |
| id required | string Example: 5a23af5f-5653-46fc-b921-dcdb0c362737 |
Responses
Response samples
- 200
- 400
- 401
- 403
- 404
- 500
{- "meta": {
- "code": 200
}, - "data": {
- "id": "string",
- "documents": [
- {
- "id": "string",
- "metadata": {
- "st_extension": {
- "authentication": {
- "headers": "string",
- "method": "string",
- "body": "string"
}
}
}, - "document_uri_options": {
- "headers": "string",
- "method": "string",
- "body": "string"
}, - "document_uri": "string",
- "document": "string",
- "display_name": "string",
- "groups": [
- [
- {
- "id": "string",
- "signer": "string",
- "automatic": "string",
- "provider_options": {
- "message": "string"
}, - "status": "string",
- "display_name": "string",
- "profile": "string",
- "reason": "string",
- "description": "string",
- "declinable": true,
- "delegable": true,
- "urlback": "string",
- "cancelback": "string",
- "constraints": [
- "string"
], - "text_fields": [
- { }
], - "clauses": [
- { }
], - "metadata": { },
- "signature_ticket": "string",
- "decline_reason": "string",
- "decline_datetime": "string",
- "where": {
- "page": 0,
- "position": "string",
- "image_uri": "string",
- "text": [
- {
- "font": null,
- "align": null,
- "valign": null,
- "text_align": null,
- "format": [ ]
}
]
}
}
]
]
}
], - "created_by": "string",
- "reason": "string",
- "title": "string",
- "not_after": "string",
- "urlback": "string",
- "cancelback": "string",
- "template_name": "string",
- "metadata": { },
- "auto_publishing": true,
- "status": "string",
- "description": "string",
- "generate_report": true,
- "created": "string",
- "gold": true
}
}If your DST list is not automatically updated, due to a weak connection or other problems, you can simply reload the page and get the updated list.
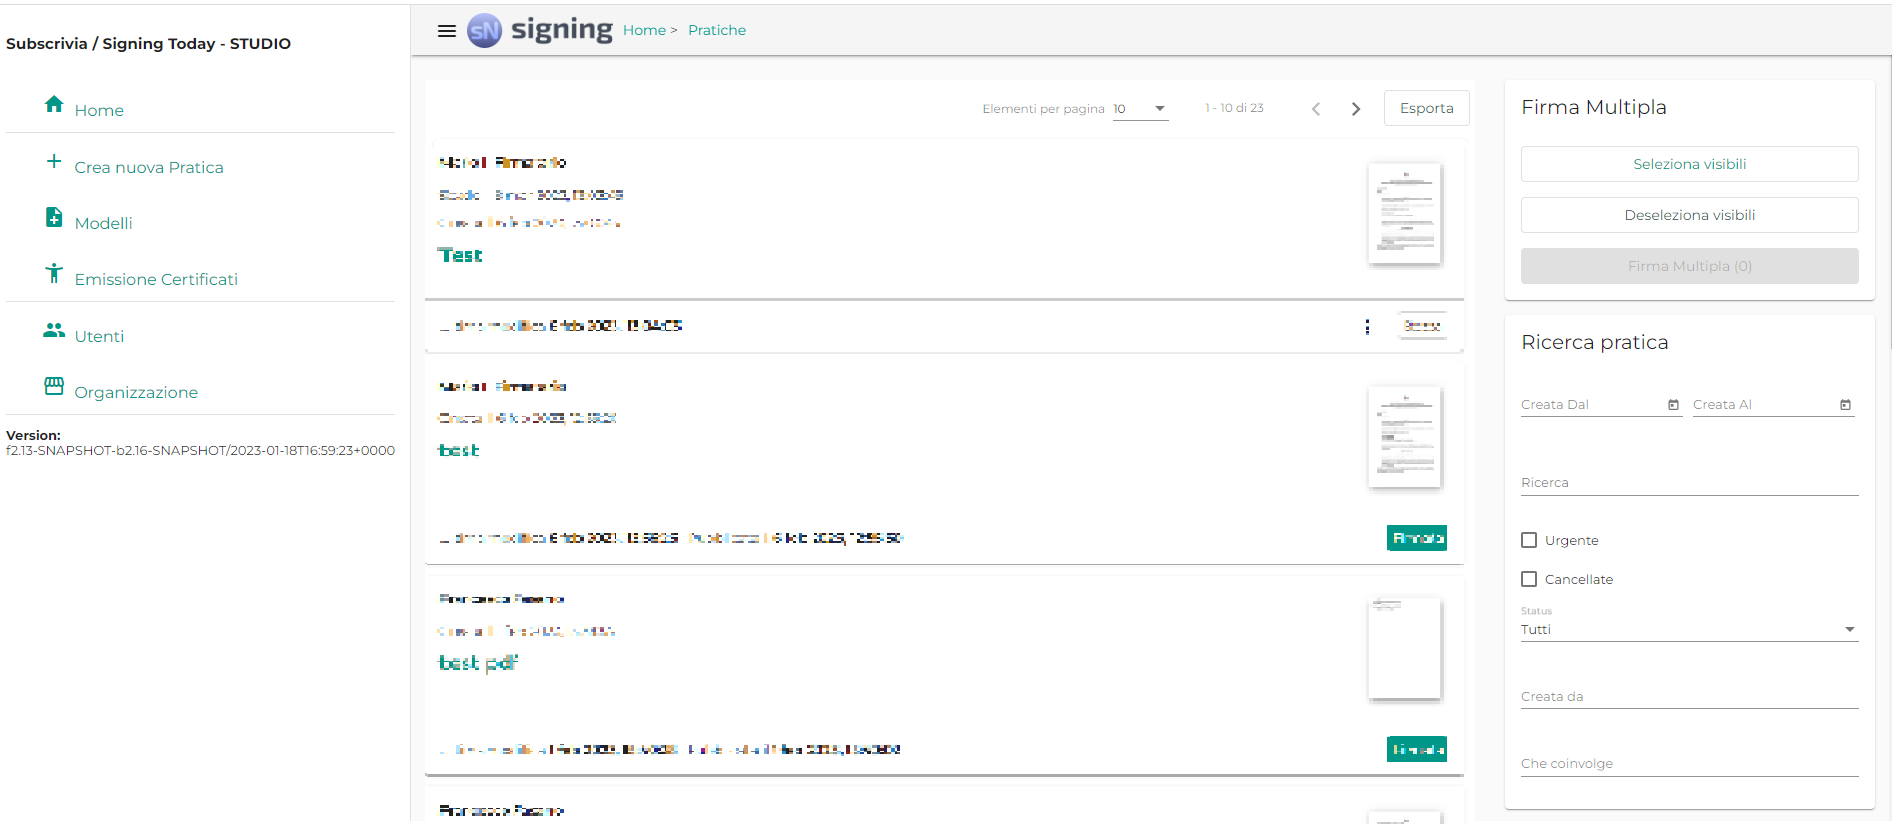
To obtain the robot user's token you have to access to Signing, then click on the burger menu and select Utenti.

Then select the target robot user and click on it, now click on the three points menu as shown in figure.
Click on manage token and copy the token.
The client id is retractable in the email sent by Bit4Id to your organization, the secret must be requested.
For disabling a user access to Signing, then click on the burger menu and select Utenti.
Then select the target user you want to disable and click on it, now click on the three points menu as shown in figure.
Now click on Disabilita.
If you want to disable a user via API you can use the Enable or disable user API described in user section.
After successfully creating the DST you have to call Retrieve DST API and retrieve the signature ticket by taking the value from the field data.documents[n]. groups[n]. signature_ticket into response.
In this case you need to set the field metadata.studio_email_disabled, in the payload of the DST
creation request, to true to disable the automatic sending of notification emails.
For changing webhook in robot user configuration you have to access to Signing, then click on the burger menu and select Utenti.
Then select the target user you want to disable and click on it, now click on the three points menu as shown in figure
Click on manage token and edit the webhook field with the new url.
For downloading signed document you have to choose the target DST in status performed then call the Retrieve a DST API declaring in URL path your slug and the DST implemented.
Then, you can explore the documents[n].document path which is valued by the URL of the signed document.
Then, make a call to the obtained URL by authenticating adding the field Authorization: Token {{token}} to the HTTP request header. Exploring every document value in documents[n] array you can easily download all signed document.
In Subscrivia you can set a urlback at the creation stage.
The urlback parameter must be added following the path documents[n].groups[n].urlback in the payload of the Create a DST API.
The link of the urlback will be used to redirect the end user after they have successfully completed the signing operation.